Please extract that Templatemonster downloaded zip in your local PC. There is 1 item inside it.
1. timelentor.zip
You need to select that timelentor.zip
1. Installation via WordPress Admin area
Step 1. Login into your WordPress admin area.
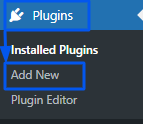
Step 2. Click on the left-side plugin menu.
Step 3. Now at top of the page, you can see Add New button, click on that button.
Step 4. Again at top of the page, you can see the Upload Plugin button, click on that button for the next process.
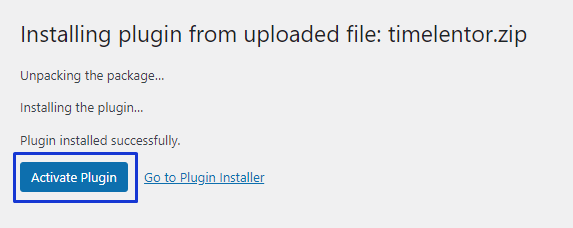
Step 5. Now upload the plugin zip file (timelentor.zip) via drag and drop or direct file upload selection. After file selection, click on Install Now button and then click on Activate Plugin link.


2. Installation Via FTP
Step 1. Extract the above-selected zip file (timelentor.zip). It will create an ‘timelentor’ folder with all plugin files & folders inside it. (Remember this extracted folder path)
Step 2. Using your FTP programs like Filezilla or cPanel, upload the non-zipped plugin folder into the /wp-content/plugins/ folder on your server.
Step 3. Go to the Dashboard » Plugins » Installed Plugins page and find ‘Timelentor – Timeline Layouts for Elementor‘ from the plugin list.
Step 4. Click on Activate to activate the ‘Timelentor – Timeline Layouts for Elementor’ plugin.